UMA Smart Desktop
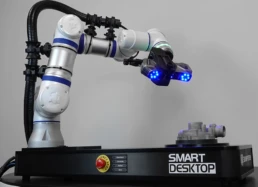
The Smart Desktop offers a comprehensive solution for small parts inspection, including a choice between a robot/tower setup, sensor, rotary table, and an optional workstation.
Each model of the Smart Desktop is designed to work seamlessly with an extensive range of 3D scanners and 2D sensors, allowing for customisation into an optical Coordinate Measuring Machine (CMM) or a visual inspection system.
Simple Software
The Streamline software offers a user-friendly interface that integrates seamlessly with all hardware components.
Rapid Performance
Featuring integration with our range of Scantech 3D scanners, this station boasts quicker cycle times than any competing system.
Boosted Productivity
Offering the high productivity at the lowest cost in comparison to any other automated metrology solution.
Enhanced Precision & Reliability
The automated Smart Desktop delivers exceptional precision and consistency in quality control operations. By minimising human error, these systems guarantee that every product consistently adheres to strict quality standards. This precision not only preserves the integrity of the manufacturing process but also significantly lowers the likelihood of defective products entering the market. Standardised inspections enable manufacturers to maintain quality assurance, ensuring that each unit meets specifications and boosts overall product reliability.
Immediate Access to Data for Strategic Decisions
A key advantage of the Smart Desktop automated inspection solutions is the capacity to provide real-time data. This immediate access to vital information enables manufacturers to swiftly spot trends and potential issues. By tackling these concerns proactively, manufacturers can modify processes in real-time, preventing quality issues and sustaining production efficiency. The proactive decision-making fostered by real-time insights creates a more responsive manufacturing environment where quality is consistently observed and enhanced.
Financial Efficiency and Superior Product Quality
The Smart Desktop’s automated 3D measurements offer substantial cost savings by minimising waste and decreasing the necessity for rework. Early identification of defects allows for prompt corrective action, preventing issues from escalating and conserving both time and resources. Furthermore, consistently producing high-quality products boosts customer satisfaction and strengthens brand reputation. By guaranteeing that products meet or surpass expectations, Smart Desktop’s automated 3D scanning for inspection provides a competitive advantage in the market, fostering long-term success and customer loyalty.
Powered By Streamline
There’s no need for a dedicated robot programmer; the Streamline software offers a user-friendly interface that integrates seamlessly with all hardware components.

Smart Desktop Technical Specification
| Type | Tower Version | Robotic Version | ||
|---|---|---|---|---|
| Base Dimensions | (WxDxH) | 800 x 300 x 91 mm | 800 x 300 x 91 mm | |
| Full Product Dimensions | (WxDxH) | 800 x 300 x 501 mm | 800 x 300 x 520 mm | |
| Weight | 28 kg | 23 kg | ||
| Rotation Table Size | 200 mm | 200 mm | ||
| Rotation Table Weight Limit | 36 kg | 36 kg | ||
